For all of you, wanting to become an expert at digital marketing, it all starts with this first move:
You obviously need a website or a blog that you can keep experimenting with, so you can practice while you learn digital marketing from ebooks, videos, blogs etc.
For this very reason, here’s a quick article on how to create your own WordPress blog!
Step 1: Buying Domain & Host
Domain- The address of your website (the text between www & .com)
Host- The storage space where you keep your website files, so the browser can open pages when the address is looked up.
I recommend, if you’re setting up a website for the first time, buy the domain & host from the same website (and not two different websites), since domain pointing is an exercise that could be time-consuming for beginners.
Go to a website like www.namecheap.com or www.hioxindia.com to purchase your domain & host.
I recommend HioxIndia as it is super cheap & provides a fairly okay support service for beginners like you. If you’re building a company website, buy from NameCheap.
Now, you’re looking for Linux Shared Hosting. It could cost you approx. Rs. 500 per annum – Rs. 1500 per annum. The domain cost depends on what you pick.
Step 2: Log in to your Website CPanel
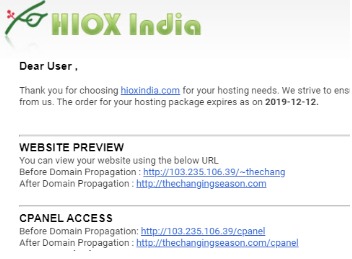
As soon as you make a transaction, you’ll receive a couple of emails which look like:
Look at CPanel Access Section above which has the ID & password mentioned in it. Open the said URL & sign in with your ID & password.
The screen in front of you is called ‘CPanel’. It has all the information to help you create new email accounts on your domain, create subdomains, look at the files on your host & so on.
Step 3: Go to AutoInstaller Scripts
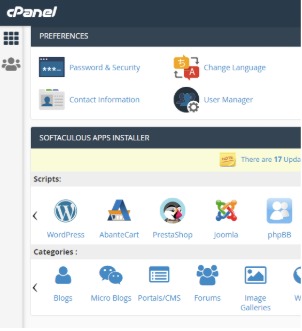
Once you log in, you’ll have a section called ‘AutoInstaller Scripts’ section as shown below:
Head over to the ‘Softaculous Apps Installer’ section. All CPanels look more or less the same, so you can have ‘Softaculous’ or something similar.
Notice the ‘WordPress’ icon there?
That’s what you want to click now.
Step 4: Install WordPress & Set it up
Once you’ve clicked on the ‘WordPress’ icon as mentioned above, the next screen will have a button called ‘Install Now’. Click on that.
Ensure that the path name is www.domain.com and NOT www.domain.com/wp
Choose a username & password for yourself & note it down somewhere.
Choose from any of the free themes & keep moving forward!
Step 5: Customize your theme
Once WordPress is set up & you’ve signed in using your WordPress ID & password (Typical URL to sign in is www.domain.com/wp-admin), you want to now customize your theme.
Go to Appearance > Themes > Customize
Start editing your website, update the logo, add site name & add images & text.
You’re ready!
Step 6: Shout out on social media!
Mention that you’re ready with your brand new blog on social media!
Collect feedback & implement the same!
That’s it!
Easy, right?
So, when are you building a blog for yourself? Comment below or email your query to me at deep@digichefs.com 🙂
Also Read: WordPress, Webflow, Shopify, Squarespace, Wix, Magento – Which is the right website builder for you?


